This architecture describes an AI agent at the edge that consumes Third Party LLM via API, stores state in SQL Database, and prioritizes minimal latency.
Azion AI Agent architecture diagram with Third party integration
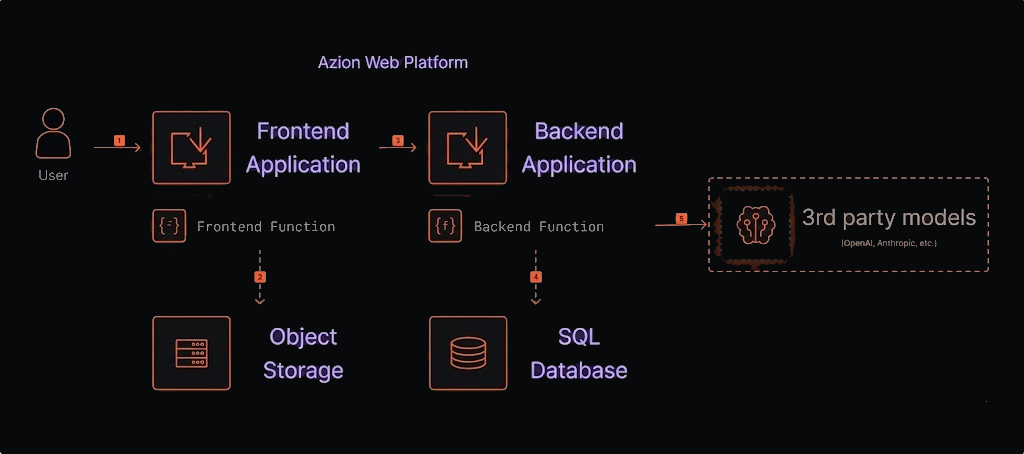
Figure 1. AI agent architecture diagram with a Third Party LLM.
Data flow
- A request arrives at the Azion Web Platform.
- The Frontend Application serves the user interface (with static files from Object Storage, e.g., CSS, HTML, etc.).
- The frontend application sends an API request to the backend function.
- The backend function reads/writes chat state to SQL for persistence and context, then executes the LangGraph agent and streams the response to the client.
- The agent calls Third Party LLMs, processes user input using database data to formulate a response, and sends it back to the user through the same path.
- The Frontend Application displays the response to the user.
Components
- Applications: an application on Azion that hosts the AI agent.
- Functions: a serverless function that contains the AI agent logic.
- Object Storage: Azion’s object storage service to store the data that the agent uses to answer questions.
- SQL Database: Azion’s database to store chat state and documents.
- Third Party LLM: LLM service (e.g., OpenAI or Anthropic).
Implementation
Use the LangGraph AI Agent Boilerplate to quickly set up a LangGraph backend and SQL base that ensures reliable persistence of state and documents.
You can obtain and configure your template through the Azion Console. To easily deploy it at the edge, click the button below.
Deploy- Access the Azion Console.
- Click
+ Createto open the templates page. - Select
LangGraph AI Agent Boilerplate. - Connect your GitHub, define the agent name, and provide the necessary keys (e.g., OpenAI API Key).
- Choose the authentication method (No Auth, Basic, Clerk) and finish with
Deploy. - Wait for propagation and access the domain
your-url.map.azionedge.net(or your custom domain).
File upload on the platform
Once the above process has been implemented, your database is already configured and ready for use. Let’s load the documents that the agent will use as context.
- Clone locally the template backend implemented in your Github account.
- Create a .env file with the necessary configurations for the template backend.
ZION_TOKEN='your_azion_personal_token'OPENAI_API_KEY='API_KEY'OPENAI_MODEL= 'model'EMBEDDING_MODEL= 'embedding-model'
# SQL Database and table names. Usually, table names are not changed,# and the database name is the name of your agent + database: agent_name_databaseMESSAGE_STORE_DB_NAME='youragent-database'MESSAGE_STORE_TABLE_NAME='messages'VECTOR_STORE_DB_NAME='youragent-database'VECTOR_STORE_TABLE_NAME='vectors'
# Optional: Langsmith to trace the requests and responsesLANGSMITH_API_KEY=LANGCHAIN_PROJECT=LANGCHAIN_TRACING_V2=false
# Optional: Clerk authentication with your frontendCLERK_PUBLISHABLE_KEY=CLERK_SECRET_KEY=- Insert the desired files in the
filessubfolder of themigrationsdirectory. If the folder doesn’t exist, create it. Currently, PDF, MD, JSON, and TXT files are supported. - In the terminal, go to the
migrationsfolder and run theyarn setupcommand to create the tables in the database. - Then, run the
yarn upload-docscommand to upload the files to Object Storage.